우선 Operator가 뭔지 알아보자.
https://kubernetes.io/ko/docs/concepts/extend-kubernetes/operator/
오퍼레이터(operator) 패턴
오퍼레이터(Operator)는 사용자 정의 리소스를 사용하여 애플리케이션 및 해당 컴포넌트를 관리하는 쿠버네티스의 소프트웨어 익스텐션이다. 오퍼레이터는 쿠버네티스 원칙, 특히 컨트롤 루프를
kubernetes.io
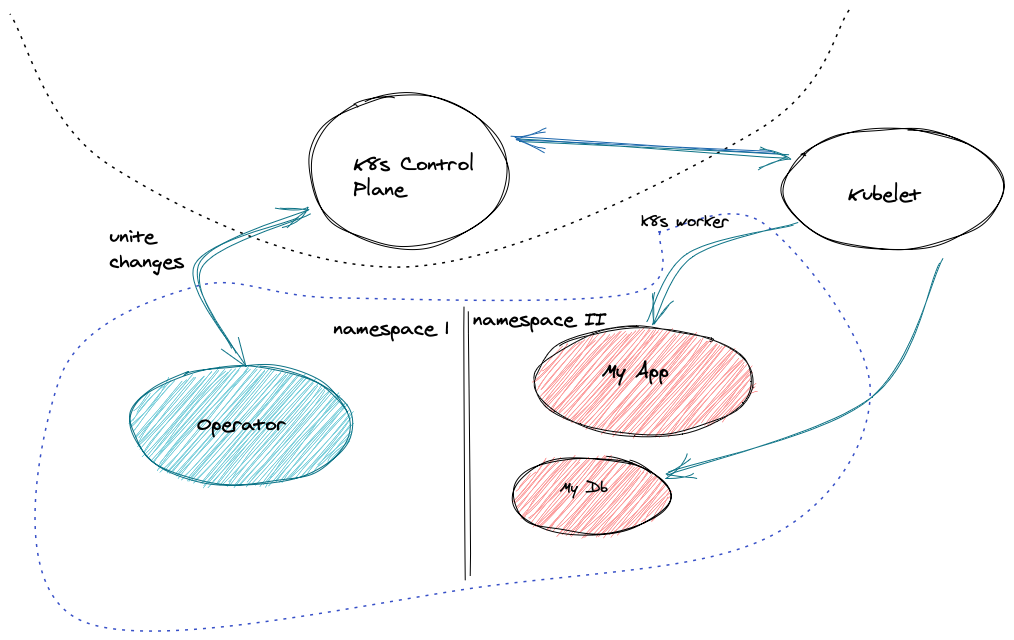
요약하면 CRD와 CR을 활용하여 자신만의 컴포넌트를 관리할 수 있는 패턴이다. 예를들어 Control plan의 scheduler처럼 사용자가 새롭게 만든 컨트롤러가 컴포넌트를 관리하게 할 수 있는 형태이다.
배포된 애플리케이션의 패키징을 관리하고 API와 kubectl 툴링에 의해 사용 관리된다. 만약 이런 오퍼레이터가 없다면 사용자는 굉장히 복잡하게 Cluster API를 사용해 관리해야 할텐데 이런 오퍼레이터의 등장으로 많은 부분이 손쉽게 처리되었다.
GitHub - cncf/tag-app-delivery: 📨🚚CNCF App Delivery TAG
📨🚚CNCF App Delivery TAG. Contribute to cncf/tag-app-delivery development by creating an account on GitHub.
github.com
그래서 facebook에서 보았던 Mysql Operator를 좀 깊숙하게 알아보려 한다.
https://dev.mysql.com/doc/mysql-operator/en/mysql-operator-introduction.html
MySQL :: MySQL Operator for Kubernetes Manual :: 1 Introduction
MySQL and Kubernetes share terminology. For example, a Node might be a Kubernetes Node or a MySQL Node, a Cluster might be a MySQL InnoDB Cluster or Kubernetes Cluster, and a ReplicaSet is a feature in both MySQL and Kubernetes. This documentation prefers
dev.mysql.com
구조는 아래와 같다 링크에서 나온것처럼 아래와 같다.
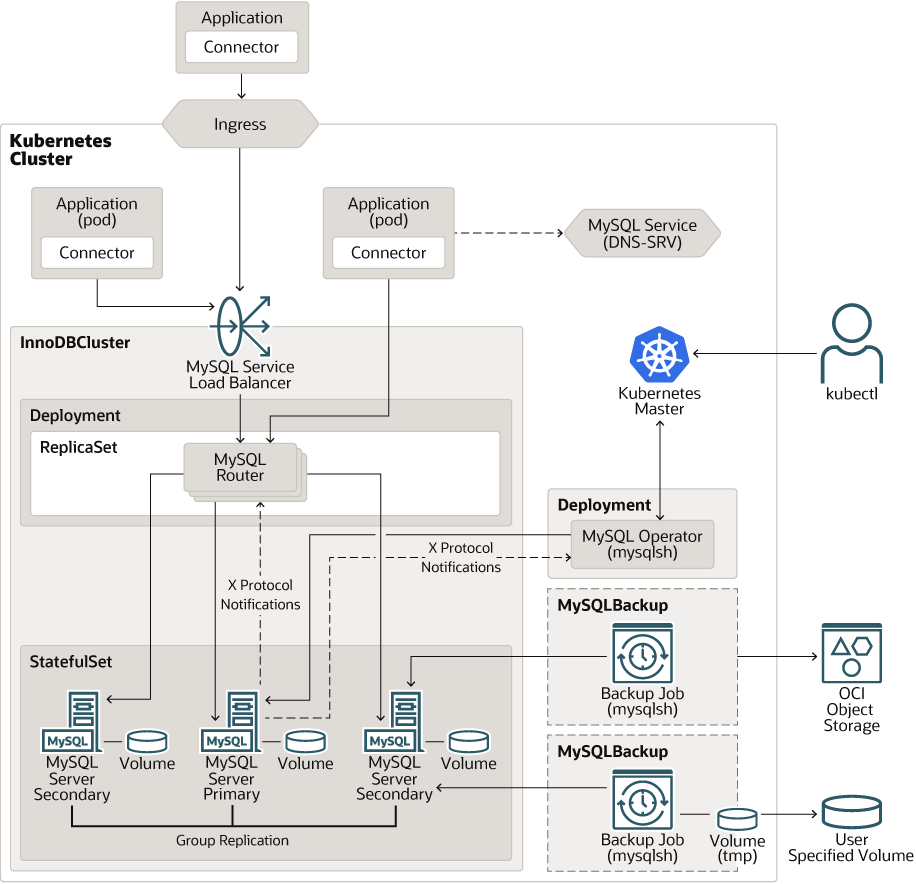
여기서 Primary와 Secondary의 복제 방식이 의문일 것이다.
일단, MySQL은 내부의 트랜젝션로그인 binlog를 복제하여 적용하는 식의 복제방식을 채택하고 있다. 이 부분은 AWS의 RDS for MySQL의 MulitAZ나 Read Replica방식과 매우 유사하다.
관련해서는 과거에 포스팅한 RDS와 Aurora의 차이를 한번 참고하면 좋을것 같다.
https://mateon.tistory.com/7?category=749156
RDS MySQL과 Aurora MySQL의 차이점
Reference docs.aws.amazon.com/ko_kr/AmazonRDS/latest/AuroraUserGuide/Aurora.Overview.html Amazon Aurora DB 클러스터 - Amazon Aurora 앞의 내용은 단일 마스터 복제를 사용하는 모든 Aurora 클러스터에 적..
mateon.tistory.com
요약하자면 RDS처럼 Primary의 저장소에 binlog를 쓰고 완료가 되면 Secondary에 복제 시그널을 보내서 스토리지에 쓰는 형태 이다. 이때 동기적으로 모든게 이루어 지는게 아닌 비동기 방식으로 진행되기에 약간의 지연이 발생할 수 있다.
따라서, 급격한 update나 insert에 대해 network latency 영향을 심하게 받는다는것.
자 그러면 여기서 우리가 중요하게 생각해야 하는 부분이있다. MSA의 CQRS 패턴이다. 먼저 MSA의 패턴은 크게 SAGA와 CQRS로 나뉜다. 이 베이스에는 DDD가 있다만 이건
https://mesh.dev/20210910-dev-notes-007-hexagonal-architecture/
헥사고날(Hexagonal) 아키텍처 in 메쉬코리아 :: MESH KOREA | VROONG 테크 블로그
…
mesh.dev
이것을 참고하기 바란다.
그렇다면 CQRS는 뭐고 SAGA는 뭐야 싶은데...
SAGA
트랜젝션 처리를 위한 Message Queue를 사용하여 상태 관리 및 보상 트렌젝션을 수행한다. 이 패턴을 또 분류하면 아래와 같이 두가지로 분류된다.
- Choreography saga
- Orchestration saga
우선 코레오그레피 사가 패턴은 하나의 Message Queue(MQ, Kafka, Kinesis, Redis...)등이 있는데 아에 이런 분산 트렌젝션을 위한 도구도 따로 만들어 진게 있다.
Seata
What is Seata? Seata is an open source distributed transaction solution that delivers high performance and easy to use distributed transaction services under a microservices architecture. Before the open source of Seata, its internal version has been playi
seata.io
Eventuate
Leverages proven technologies Rather than reinvent the wheel, Eventuate builds on familiar, proven, and robust technologies, such as MySQL and Apache Kafka. Multi-language and framework Eventuate is available for a variety of languages and frameworks - Jav
eventuate.io
요 두놈들인데...이건 나중에 오퍼레이터를 찾아봐서 있으면 테스트 해보도록하고...코레오그레피 사가는 하나의 Message Broker에서 트렌젝션과 상태 처리를 하기 때문에 전체적으로 관리가 쉽지만 트렌젝션이 많아지면 많아질수록 대환장파티가 생겨난다.
그래서 좀 개선된 형태가 Orchestration saga이다
요놈은 모든 통신을 담당하는 중앙 오케스트레이터가 각각의 트렌젝션을 관리하며 문제가 발생했을경우 각 도메인 서비스에 보상 트렌젝션을 발생시킨다. 물론 중간에서 관리하는 놈이 따로 필요하기 때문에 어느정도 개발 공수가 들어간다.
참고로 AWS에서는 Step Function과 SWF로 관리가 가능하다. 물론 만들어져 있는 놈도 있다.
The Universal Process Orchestrator | Camunda
Camunda's process automation platform allows developers to design, automate and improve processes. Start your free trial today.
camunda.com
Home
Supports over 50 Data Formats Camel supports around 50 data formats, allowing to translate messages in multiple formats, and with support from industry standard formats from finance, telco, health-care, and more. See Supported Formats
camel.apache.org
CQRS
자 오늘 테스트의 주인공인 CQRS이다. 요놈은 C와 RUD를 분리하여 관리하는 패턴이다. 대부분의 서비스는 RUD보다 C가 많이 사용된다. 그래서 아에 로직을 두개로 나누어서 경우에 따라 캐시서버를 두고 write through 또는 Back, Lazy loading등 다양한 기법으로 Select의 성능을 높힌다. 또한 서비스가 고도화 되면 될수록 복잡해지는 도메인과도 무척 잘 어울린다.
여기서 중요한게 바로 DB의 읽기전용 복제본 분리인데. 이게 이번 테스트의 핵심이다. 사실...이 패턴에서 Event Sourcing이 DB가 분리됨에 있어 어느정도 단점을 보완해주는 놈인데 요놈이 아까 말한 캐시서버이다.
그렇다면 캐시 서버가 없다면 어떤 무식한 짓이 일어날지 궁금하지 않나...?
그래서 MySQL Operator가지고 놀아보기로 했다.
우선 설치를 해보자
설치는 매우 간단하다.
helm repo add mysql-operator https://mysql.github.io/mysql-operator/
helm install mysql-operator mysql-operator/mysql-operator --namespace mysql-operator --create-namespace
위처럼 Helm을 제공하니 설치해주면 된다.
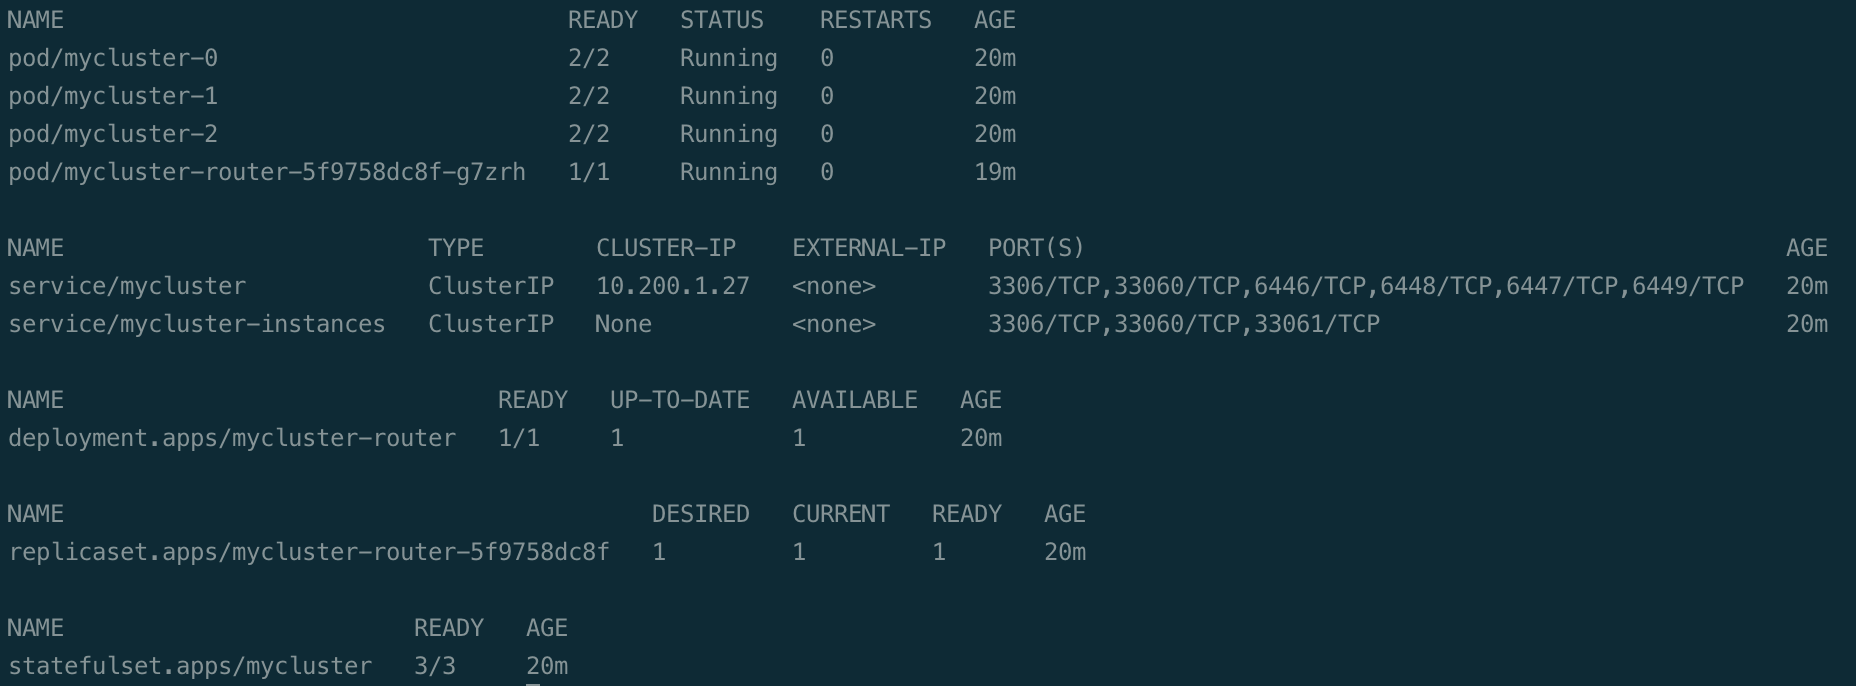
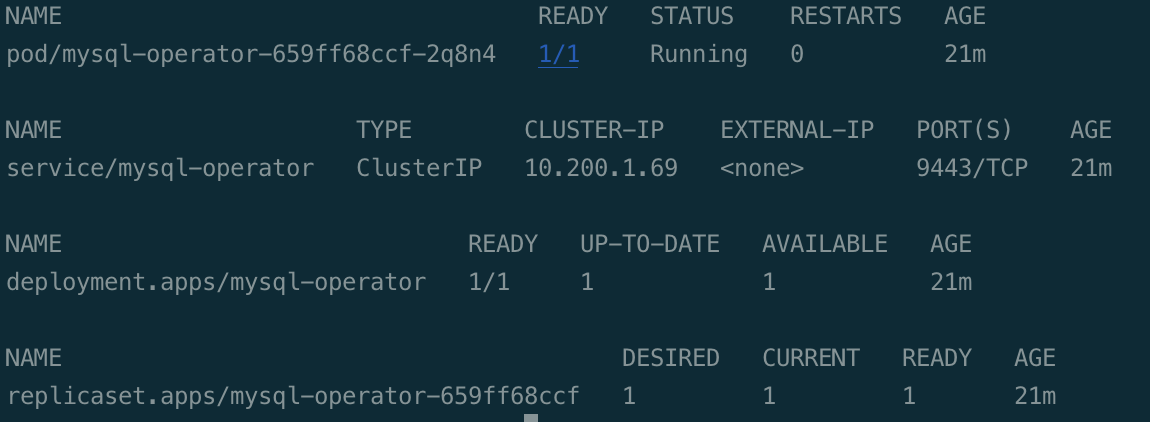
설치를 하면 위처럼 Operator와 Cluster가 생성된다.
자 그러면 이제 궁극적으로 원했던 성능 테스트의 환경 일부분이 만들어졌다.
설치가 완료 되었으니 매트릭을 수집한 Promethus와 테스트할 locust를 설치하자
Autoscaling으로 Kubernetes 지연시간 줄이기 - NGINX STORE
조직에서 Kubernetes로 앱을 구축했으며 이제 인기를 얻고 있습니다! 하루에 몇 명의 방문자에서 수백 명(때로는 수천 명)으로 증가했습니다. 하지만 문제가 있습니다. 트래픽 증가로 인해 병목
www.nginxplus.co.kr
위의 내용을 참고하여 설치했다. 아...근데 이거로 하면 Python과 함께 FastAPI를 하나 만들어야 한다. 일단 퀵하게 만들어 보자.
아주 심플하게 만들었다.
docker pull mateon01/sample-fastapi:1.0.3파라미터는
- db_url_val
- db_reader_val
두개면 충분하다. 포멧은 아래처럼 입력해 주면 된다
mysql+pymysql://[user]:[password]@db host name]:3306/[dbname]
코드도 매우매우 심플하다.
@app.get("/get")
async def create_select(db: Session = Depends(get_db),db2: Session = Depends(get_db2)):
    user = schemas.UserCreate
    user.email = str(uuid.uuid4()) + '@gmail.com'
    user.password = uuid.uuid4()
    db_user = crud.create_user(db, user)

    logging.info(db_user.email)
    return db2.query(models.User).filter(models.User.email.like(db_user.email)).all()
그냥 insert후 바로 select 한다. 커넥션을 두개로 나누었다. 하나는 writer에 하나는 reader에
물론 만들기 귀찮으면 아래의 내용을 참고해서 locust cli로 테스트를 해 보아도 충분히 확인이 가능하다.
Create custom clients in Locust.io to test database performance
As you may know, Locust was built with HTTP as its main target. Hence, all tutorials and examples you will ever see only tells us how to…
medium.com
여기에 보면 Locust로 DB를 접근하여 테스트 할 수 있는 예제 소스가 있다. 적절하게 바꾸자(귀찮으신분들 우선으로...)
이제 다음 포스팅에선 실제로 조져볼것이다.
Coming soon
'Server Infra > Kubernetes' 카테고리의 다른 글
| EKS 쉽게 만드려고 삽질하는중 (1) | 2022.09.19 |
|---|---|
| K8s Study DOIK - MySQL Operator for Kubernetes #2 (0) | 2022.06.05 |
| Istio EnvoyFilter Redirect 이슈 (0) | 2022.05.06 |
| finalizers 제거기(Namespace Terminating) (0) | 2022.05.06 |
| Docker Image 사이즈 튜닝 (0) | 2022.01.09 |


